Dual booting Windows after encrypted Ubuntu
Hi there 👋! Soo, this is first post ever 🤭! But don’t worry, I won’t overwhelm this post with any introductions and will just jump to the point 🎉
If you want to have both Linux and Windows on your PC, you probably already know you can dual-boot them. For most people, it’s Windows first and Linux later. In that case, you’re all good, because your distro installer will guide you all the way and handle all partition stuff safely 🥰
But if you already have Ubuntu, and want to add Windows to it, brace yourself. If you are paranoiac, and installed Ubuntu with encryption like me, then you need to prepare for a long journey ;_; - this is what this post will be about
Some meta
I am making this post because when I wanted to do this, I’ve searched for literally 5 hours and found absolutely nothing, while I thought this is one of the most common situations out there 🤐 - thus, I won’t get deep into every single step (how to etch Linux on usb etc) - if you are completely oblivious about this, just Google them 👍
Also, I’ve pasted most of terminal stuff as-is - with all user@computer:/home/user#, and all text that you may not need - just to make that everything matches when you execute it and there are no extra warning prints/whatever
Because of this, this post may seem long/overwhelming, so prepare a notepad to write down where you are and what “magic numbers” you need to remember
TL;DR - you don’t want to do this ;_;
If you are an Ubuntu soyboy like me and don’t have time to mess with partitioning and filesystems, you want to avoid doing this at any chance - unless you don’t already have 1000 customizations and 50GB of IDEs installed, you probably want to just back up your stuff, install Windows on clear drive and install Ubuntu afterwards.
Other limitations
Windows doesn’t support LVM at all. So you will be able to mount and use Windows’ NTFS partition from Ubuntu, but not the other way around 😞
If you didn’t resign yet, read along
Ps. If your Ubuntu is not encrypted, it’s not that bad - you can just pick first tutorial from Google and should be fine. We are talking about encrypted installation from now on
My setup
I did all of this on setup described below. If any of your stuff is different (you use different distro, newer Ubuntu version, ZSF instead of LVM or something) I can’t tell if any of steps will work
- Normal x64 (amd64) laptop (no ARM processor or anything)
- Standard modern bios (I think mine is also UEFI (because it’s a modern laptop) but doesn’t have super flashy gui, just standard blue+gray-ish stuff
- Secure boot disabled
- 300GB SSD disk (yours can be HDD or NVM, this doesn’t matter)
- Ubuntu 21.04 - installed by “Erase disk and install Ubuntu” -> “Use LVM” -> “Encrypt”
What we need to do
Windows can’t do any of cool “resize other os and install in remaining free space” automatically like most Linux distros - so we will need to do everything manually:
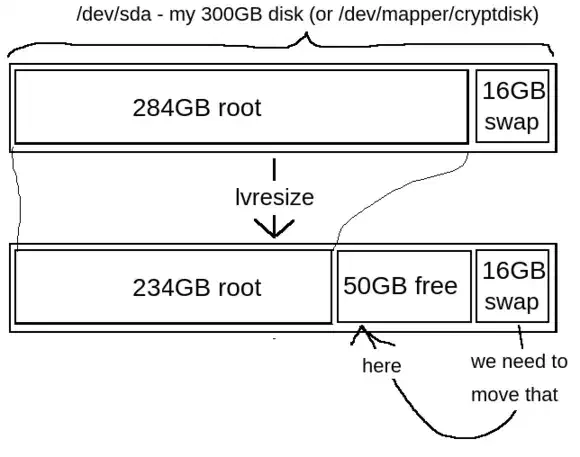
- Resize Linux partition to make free unallocated space on disk
- Boot up Windows installer from USB
- Choose free space in Windows installer
But because encrypted ubuntu requires you to use LVM, step 1. will take us some effort
LVM stands for Logical Volume Manager - I will not get deeper into this (since I don’t understand it myself), but this is some cool new way to “easily” manage, resize and modify partitions volumes
I put “easily” in quotes because while it allows you to do stuff that classic partitions couldn’t, it’s more complicated to actually use -_-
Step 0. - Backup your data
You probably heard this, and probably won’t do it out of laziness anyway 🙃 (I didn’t 😇) - but if you mess up any of magic numbers below, you may break your partitions and lose your data! I am not responsible for any loss, you’re doing this on your own risk!
Step 1. - Resize Linux partition
To do this, you probably know we need to boot clean Ubuntu/other linux from USB. Go ahead and download nice Ubuntu .img and flash it with balenaEtcher or something
Turn off your PC and turn it on while smashing that DEL/F12/F10/F2/whatever key to override boot device in bios
Remember me ranting about how I couldn’t find anything for 5 hours? Well, after sixth hour I found this great article on ArchWiki: https://wiki.archlinux.org/title/Resizing_LVM-on-LUKS - ahh, ArchWiki, couldn’t love you more 💖 - I strongly suggest you to follow/at least read through it, because my steps are not going to be as detailed
As written in article above:
“Do not run any of this code by copy-pasting, you need to adapt all these commands to your specific setup.”
Note:
$before commands mean they can be executed as normal user, and#with root - it’s probably best to justsudo suand not worry
Run lsblk. It should look something like this:
ubuntu@ubuntu:~$ lsblk
NAME   MAJ:MIN RM   SIZE RO TYPE MOUNTPOINT
# Some snaps etc
loop0    7:0    0   2.3G  1 loop /rofs
loop1    7:1    0     4K  1 loop /snap/bare/5
loop2    7:2    0  99.3M  1 loop /snap/core/11743
loop3    7:3    0  61.8M  1 loop /snap/core20/1242
loop4    7:4    0  99.4M  1 loop /snap/core/11993
loop5    7:5    0  54.2M  1 loop /snap/snap-store/558
loop6    7:6    0  54.2M  1 loop /snap/snap-store/557
loop7    7:7    0  61.8M  1 loop /snap/core20/1169
loop8    7:8    0 242.3M  1 loop /snap/gnome-3-38-2004/76
loop9    7:9    0  65.2M  1 loop /snap/gtk-common-themes/1519
loop10   7:10   0 247.9M  1 loop /snap/gnome-3-38-2004/87
# Our main largest disk - one we are interested in
sda      8:0    0 279.5G  0 disk
├─sda1   8:1    0   512M  0 part
├─sda2   8:2    0   732M  0 part
└─sda3   8:3    0 278.2G  0 part  # The largest partition - probably root
# Probably USB that you're booting from
sdb      8:16   1  14.6G  0 disk
├─sdb1   8:17   1   3.6G  0 part /cdrom
└─sdb2   8:18   1    11G  0 part /media/ubuntu/casper-rw
From above, figure out which /dev/sdX disk is your main, and which /dev/sdXY is your main partition - use it instead of mine (/dev/sda3) in all steps below
Note: if you have NVMe disk, it will be named like: first disk=>
/dev/nvme0n1instead of/dev/sda; second disk=>/dev/nvme1n1instead of/dev/sdbetc
Decrypt LUKS volume and walk around
Decrypt with your password: # cryptsetup luksOpen /dev/sda3 cryptdisk
Run # lvs to see your logical volumes and their group. Should look like:
root@ubuntu:/home/ubuntu# lvs
  LV     VG       Attr       LSize   Pool Origin Data%  Meta%  Move Log Cpy%Sync Convert
  root   vgubuntu -wi-a----- 277.23g
  swap_1 vgubuntu -wi-a----- 976.00m
So root is our LV and vgubuntu is our VG (volume group)
Resize filesystem and LVM logical volume
Decide how many GB you actually want to leave free - be aware that, you may not be able to extend this later on because of how traditional partitions work! If you want to have 2-5 games installed, I think ~500GB is enough 🤔 I’ve personally fit Forza Horizon 4 & 5, + Mirror’s Edge Catalyst on my 300GB 🙆👌
Once you decided, run: # lvresize -L -XGB --resizefs vgubuntu/root where X is the number of GB you want to leave free
Note:
-50GBwill shrink it by 50GB,+100GBwill expand by 100, and200GBwill set it to be exactly 200 👌
root@ubuntu:/home/ubuntu# lvresize -L -50GB --resizefs vgubuntu/root
fsck from util-linux 2.36.1
/dev/mapper/vgubuntu-root: Inode 6820863 extent tree (at level 1) could be shorter.  IGNORED.
/dev/mapper/vgubuntu-root: 1350868/18169856 files (0.4% non-contiguous), 34264580/72674304 blocks
resize2fs 1.46.3 (27-Jul-2021)
Resizing the filesystem on /dev/mapper/vgubuntu-root to 59567104 (4k) blocks.
The filesystem on /dev/mapper/vgubuntu-root is now 59567104 (4k) blocks long.

  Size of logical volume vgubuntu/root changed from 277.23 GiB (70971 extents) to 227.23 GiB (58171 extents).
  Logical volume vgubuntu/root successfully resized.
Run fsck to check if everything is okay (you can click “y” if it asks you to optimize something, it should be alright 👌):
root@ubuntu:/home/ubuntu# fsck -f /dev/vgubuntu/root
fsck from util-linux 2.36.1
e2fsck 1.46.3 (27-Jul-2021)
Pass 1: Checking inodes, blocks, and sizes
Inode 6820863 extent tree (at level 1) could be shorter.  Optimize<y>? yes
Inode 9179538 extent tree (at level 2) could be narrower.  Optimize<y>? yes
Pass 1E: Optimizing extent trees
Pass 2: Checking directory structure
Pass 3: Checking directory connectivity
Pass 4: Checking reference counts
Pass 5: Checking group summary information

/dev/mapper/vgubuntu-root: ***** FILE SYSTEM WAS MODIFIED *****  # It screams that it was modified but that's okay
/dev/mapper/vgubuntu-root: 1350868/14893056 files (0.5% non-contiguous), 34057983/59567104 blocks
Resize LVM physical Volume
Now this will get complicated.
PVS stands for Physical Volume - some another LVM abstraction
You’ll need to use this formula form our friends at ArchWiki: NEW_VOLUME_BYTES = (PE_SIZE * PE_COUNT) + UNUSABLE_SIZE
Run pvdisplay to see numbers we need:
root@ubuntu:/home/ubuntu# pvdisplay
  --- Physical volume ---
  PV Name               /dev/mapper/cryptdisk
  VG Name               vgubuntu
  PV Size               <278.23 GiB / not usable 3.00 MiB  # UNUSABLE_SIZE - 3.00 MiB - 3145728 bytes
  Allocatable           yes
  PE Size               4.00 MiB  # PE_SIZE - 4.00 MiB - 4194304 bytes
  Total PE              71226
  Free PE               12811
  Allocated PE          58415  # PE_COUNT - second number
  PV UUID               5Ab52d-Y1bw-IcWj-5mvn-VZ0g-j2vx-YcXFHW
Note: in case you don’t know - MiB stands for mebi-bytes - unit where 1KiB (kibi-byte) is well-known 1024 bytes. MB should stand for megabytes, that nowadays are pure-1000 multiplier, but you newer know if you program means MB as new or old standard 😅
But at least you can be sure that 1 MiB is 1048576 bytes 👌
So, in my case: NEW_VOLUME_BYTES = (4194304 * 58415) + 3145728 = 245013413888
root@ubuntu:/home/ubuntu# pvresize --setphysicalvolumesize 245013413888B /dev/mapper/cryptdisk
/dev/mapper/cryptdisk: Requested size <228.19 GiB is less than real size <278.23 GiB. Proceed?  [y/n]: y
  WARNING: /dev/mapper/cryptdisk: Pretending size is 478541824 not 583489536 sectors.
  /dev/mapper/cryptdisk: cannot resize to 58415 extents as later ones are allocated.
  0 physical volume(s) resized or updated / 1 physical volume(s) not resized
“cannot resize to XXX extents as later ones are allocated”
In my case, it failed, because it looks like data in volume isn’t properly aligned - instead, free space is scattered across few different places
We need to align it. Run # pvs -v --segments too se what’s going on:
root@ubuntu:/home/ubuntu# pvs -v --segments
  PV                    VG       Fmt  Attr PSize    PFree  Start SSize LV     Start Type   PE Ranges
  /dev/mapper/cryptdisk vgubuntu lvm2 a--  <278.23g 50.04g     0 58171 root       0 linear /dev/mapper/cryptdisk:0-58170
  /dev/mapper/cryptdisk vgubuntu lvm2 a--  <278.23g 50.04g 58171 12800            0 free
  /dev/mapper/cryptdisk vgubuntu lvm2 a--  <278.23g 50.04g 70971   244 swap_1     0 linear /dev/mapper/cryptdisk:70971-71214
  /dev/mapper/cryptdisk vgubuntu lvm2 a--  <278.23g 50.04g 71215    11            0 free
As you can see, in my case, root was shrunk, but swap_1 was after it, and it stayed in its place
We’ll do this with
# pvmove --alloc anywhere /dev/mapper/cryptdisk:XXXX-YYYY
…where X is the beginning and Y is the end of segment we want to move (note: the “-” character is literal - I don’t mean a minus sign 🙃)
Start SSize LV     Start Type   PE Ranges
    0 58171 root       0 linear /dev/mapper/cryptdisk:0-58170
58171 12800            0 free
# Beginning of swap_1 - our XXXX => 70971
70971   244 swap_1     0 linear /dev/mapper/cryptdisk:70971-71214
# End of swap_1 - our YYYY => 71215
71215    11            0 free
Note: I think 71214 is actual end of swap_1, but if you just have free space after it, you can safely paste it - in case you have something else after swap_1 (or other free-floating-volume), -1 it’s beginning to get end of previous one I think
root@ubuntu:/home/ubuntu# pvmove --alloc anywhere /dev/mapper/cryptdisk:70971-71215
  /dev/mapper/cryptdisk: Moved: 3.28%  # This will update live
  /dev/mapper/cryptdisk: Moved: 100.00%
root@ubuntu:/home/ubuntu# pvs -v --segments
  PV                    VG       Fmt  Attr PSize    PFree  Start SSize LV     Start Type   PE Ranges
  /dev/mapper/cryptdisk vgubuntu lvm2 a--  <278.23g 50.04g     0 58171 root       0 linear /dev/mapper/cryptdisk:0-58170
  /dev/mapper/cryptdisk vgubuntu lvm2 a--  <278.23g 50.04g 58171   244 swap_1     0 linear /dev/mapper/cryptdisk:58171-58414
  /dev/mapper/cryptdisk vgubuntu lvm2 a--  <278.23g 50.04g 58415 12811            0 free
Everything nice and linear 🎉🎉
Back to pvresize
Now let’s run previously failed pvresize:
root@ubuntu:/home/ubuntu# pvresize --setphysicalvolumesize 245013413888B /dev/mapper/cryptdisk
/dev/mapper/cryptdisk: Requested size <228.19 GiB is less than real size <278.23 GiB. Proceed?  [y/n]: y
  WARNING: /dev/mapper/cryptdisk: Pretending size is 478541824 not 583489536 sectors.
  Physical volume "/dev/mapper/cryptdisk" changed
  1 physical volume(s) resized or updated / 0 physical volume(s) not resized
Yay 🥳
Resize LUKS
Here is the second magic formula from our Arch friends: NEW_LUKS_SECTOR_COUNT = (PV_EXTENT_COUNT + PV_UNUSABLE_EXTENTS) * PV_EXTENT_SIZE / LUKS_SECTOR_SIZE
root@ubuntu:/home/ubuntu# pvdisplay /dev/mapper/cryptdisk
  --- Physical volume ---
  PV Name               /dev/mapper/cryptdisk
  VG Name               vgubuntu
  PV Size               <228.19 GiB / not usable 2.00 MiB  # 2MiB unusable
  Allocatable           yes (but full)
  PE Size               4.00 MiB  # PV_EXTENT_SIZE - 4MiB - 4194304 bytes
  Total PE              58415  # PV_EXTENT_COUNT
  Free PE               0
  Allocated PE          58415
  PV UUID               5Ab52d-Y1bw-IcWj-5mvn-VZ0g-j2vx-YcXFHW
You need to count how many times “unusable” space would fit into “PE Size” - in my case, it’s even lower, so it’s 1
root@ubuntu:/home/ubuntu# cryptsetup status cryptdisk
/dev/mapper/cryptdisk is active and is in use.
  type:    LUKS2
  cipher:  aes-xts-plain64
  keysize: 512 bits
  key location: keyring
  device:  /dev/sda3
  sector size:  512  # LUKS_SECTOR_SIZE
  offset:  32768 sectors
  size:    583489536 sectors
  mode:    read/write
NEW_LUKS_SECTOR_COUNT = (58415 + 1) * 4194304 / 512 = 478543872
Now go ahead and use that number:
root@ubuntu:/home/ubuntu# cryptsetup -b 478543872 resize cryptdisk
Enter passphrase for /dev/sda3:  # Your disk password
root@ubuntu:/home/ubuntu#  # Just like that!
Last step - resize partition
The last formula: NEW_PARTITION_SECTOR_END = PARTITION_SECTOR_START + (LUKS_SIZE_SECTORS + LUKS_OFFSET_SECTORS) - 1
root@ubuntu:/home/ubuntu# cryptsetup status cryptdisk
/dev/mapper/cryptdisk is active and is in use.
  type:    LUKS2
  cipher:  aes-xts-plain64
  keysize: 512 bits
  key location: keyring
  device:  /dev/sda3
  sector size:  512
  offset:  32768 sectors  # LUKS_OFFSET_SECTORS
  size:    478543872 sectors  # LUKS_SIZE_SECTORS - different than previously because we resized it
  mode:    read/write
Now close LUKS:
root@ubuntu:/home/ubuntu# vgchange -a n vgubuntu
  0 logical volume(s) in volume group "vgubuntu" now active
root@ubuntu:/home/ubuntu# cryptsetup close cryptdisk
root@ubuntu:/home/ubuntu#
And open parted to check PARTITION_SECTOR_START:
root@ubuntu:/home/ubuntu# parted /dev/sda
GNU Parted 3.4
Using /dev/sda
Welcome to GNU Parted! Type 'help' to view a list of commands.
(parted) unit  # Select units
Unit?  [compact]? s
(parted) p  # Show partitions
Model: ATA INTEL SSDSC2BB30 (scsi)
Disk /dev/sda: 586072368s
Sector size (logical/physical): 512B/4096B
Partition Table: gpt
Disk Flags:

Number  Start     End         Size        File system  Name                  Flags
 1      2048s     1050623s    1048576s    fat32        EFI System Partition  boot, esp
 2      1050624s  2549759s    1499136s    ext4  # This is ext4, but it's wayyy to small to be our root
 # THIS is what we are looking for (look at it's size) (an no filesystem type, since it's encrypted for now)
 # This start 👇 is our PARTITION_SECTOR_START
 3      2549760s  586072063s  583522304s

(parted)
# Don't quit - stay in parted for now
NEW_PARTITION_SECTOR_END = 2549760 + (478543872 + 32768) - 1 = 481126399
And type that into parted:
(parted) resizepart 3 481126399  # 3 is the number of our root partition - yours *could* be different
Warning: Shrinking a partition can cause data loss, are you sure you want to continue?
Yes/No? y
(parted) q
Information: You may need to update /etc/fstab.

root@ubuntu:/home/ubuntu#
WE ARE DONE RESIZING 🎉🎉🎉!!!
If you calculated everything correctly, you can open gparted/Ubuntu disks and see that you have nice unallocated space 🚀
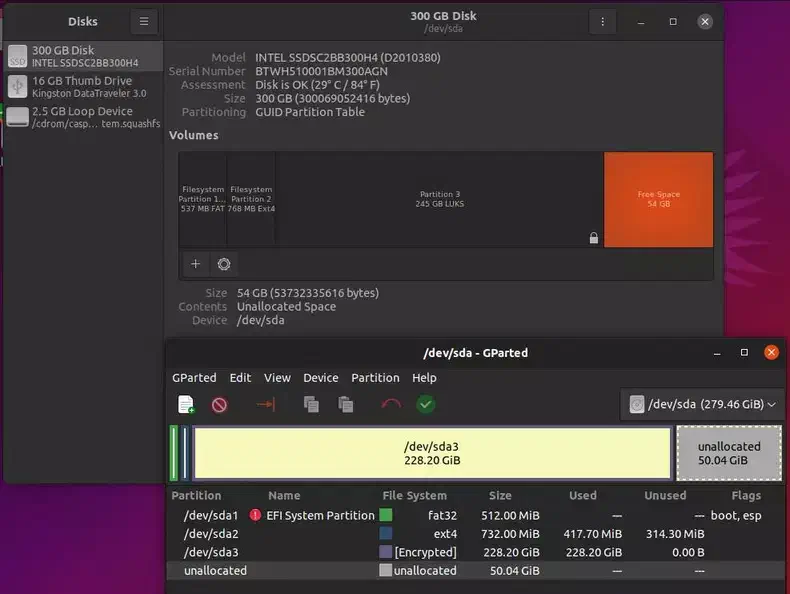
You can close Ubuntu and open the champagne 🍾
Step 3. - Install Windows
Nowadays, Windows is free to download from Micro$oft’s page 👍
10 vs 11
If your computer supports it, and you’re wondering on Windows 11, and are looking for opinion, then here is mine:
- 11 finally looks like something modern
- saves your ears from those PTSD-triggering windoza-10-system-sounds
- in general, feels kinda like Xbox but for your PC
- they promised some big optimizations for games, so if you care about that in the future, you may want it
But under the hood
- it’s still same shitty architecture
- still ruins your day with updates
- still opens Bing when you make a typo in “Menu” search
- still opens Micro$oft store when you type in
python3in cmd 🤮
So if you don’t really care about UI look at all, use 10 👍 - otherwise, I didn’t have any big stability/support issues with 11 - just usual “some .dll’s missing after installing pirated games 💀”
Anyway, here are the links:
- https://www.microsoft.com/software-download/windows10
- https://www.microsoft.com/software-download/windows11
Flashing Windows usb
Most of the popular usb etchers on linux (like balenaEtcher) don’t support Windows 😶 you can try WoeUSB, but it’s complicated to install etc - if you really need to, Google how to do it, but from what I’ve seen
- community apt repository is probably outdated
- snap is also >3 years old
.bashfrom their GitHub release has some dependency issues on Ubuntu
Maybe some day they will finally release a .AppImage 🤷
…if you have such possibility, just get Rufus on other Windows machine 👍👍 https://rufus.ie/
Installing
Just as previously, turn off your computer, smash that DEL button and override boot to USB stick
Then go ahead with your normal windows installation
When you get to this dialog:
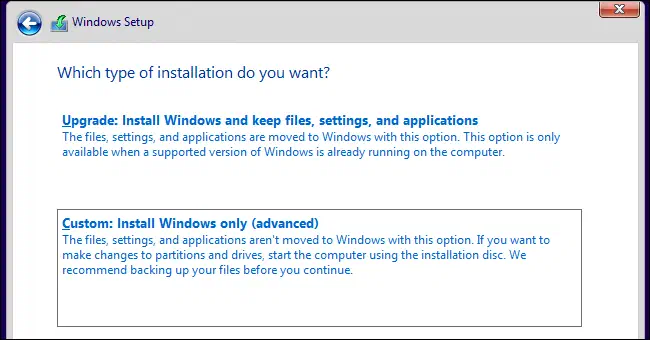
…make sure to select “Custom: Install windows only”, and then select the drive item that matches amount of space you’ve previously freed
Step 4. - Enjoy the spyware 🥳
- If you’re stuck on one of the steps and some command doesn’t want to work - keep trying, don’t give up 💪 it took me literally ~9 hours to finish all of this - just don’t do some “Yes, do as I say!” incident out of frustration 😟
- If you did the incident, and are currently crying over your lost data, install Gentoo
- If you’ve done everything correct, I wish you very happy gaming/using Adobe/other closed-source capitalism stuff 🥳